What those squeaks are telling you
The heart of your braking system
Brake noise is one of the most common complaints of vehicle owners. And given the growing popularity of nearly silent electric vehicles, even minor braking noise can be aggravating. But, while noises such as squeaking and grinding are common, they are not normal. In fact, many of these noises point to specific issues that can be corrected by a skilled technician.
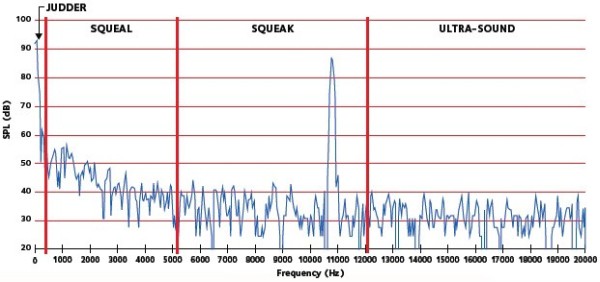
A low frequency vibration or judder can be caused by macro-vibrations of a brake disc, while a medium squeal can point to micro-vibrations in the caliper piston or other part. The most common complaint, however, is a high-pitch noise that sounds like a squeak. Let's take a closer look. In fact, many of these noises point to specific issues that can be corrected by a skilled technician.
The fundamentals of squeaky brakes
No doubt about it, squeaky brakes can be annoying. The good news is this noise typically does not indicate a dangerous condition. Brake squeaks are classified as noises of frequencies higher than 5 kHz, most likely traced to molecular vibration within the brake pads' friction materials. Under certain circumstances when the brake pads are pressed against the brake disc, in normal operation, the disc, pads and caliper can vibrate similar to the way a violin string vibrates when it is stroked by a bow.
Avoiding squeaks and other annoying brake noise requires an optimal bedding-in of new brake pads and their corresponding brake discs.

Tips for workshop professionals
Begin the bedding-in process while the vehicle is still at the workshop. Perform a test drive of the vehicle and perform 20 to 30 test stops from approximately 50 km/h to 0. Be careful to keep brake temperature below 200°C during the first 10 stops. Temperatures can rise from 200 to 300°C, but not higher, between the 10th and 20th stops. Beyond 20 stops, make sure the temperature stays below 350°C. This is particularly important when the new pads are matched to new, coated brake discs.
It is important for installers and their customers to avoid overheating the pads and discs during the first 300 km of service. Overheating - commonly caused by intermittent or repeated heavy braking - can severely damage the friction formulation and disc metallurgy.

Communicating the customer's role
The bedding-in process will continue after the customer picks up their vehicle.
Make sure they understand the importance of braking only moderately during the first 300 km of service. This ensures proper expansion of the pad-disc contact area, reduces the risk of overheating and conditions the pads and discs to provide exceptional performance and reliability.
Properly fitting pads to calipers
Brake pads and calipers must be correctly fitted to avoid common issues such as brake judder, squeal or squeaking. Here are some proven steps for performing a quality brake assembly. And remember to always perform a test drive to verify proper braking performance:
- Fully strip and clean caliper slides and pins
- Use emery paper only to remove corrosion from the caliper and pad abutments. Be sure the caliper is sliding easily. Otherwise, tapered, uneven pad wear can occur, resulting in squeal or judder.
- Caliper pins must have the correct lubrication to ensure free movement. Also be sure the pin does not seize within the caliper body. Inspect the slide pin rubber boots to ensure a proper seal against water.
- Confirm free piston movement and fully retract the piston. This is essential to avoid damage to the shim or rubber coat.
- Verify that the brake pads fit easily into the caliper brackets.
- If necessary, remove any burrs from brake pad edges. Note: Be sure the pad moves freely within the brackets. If not, there likely will be ongoing light contact with the discs, causing squealing as well as tapered pads or uneven wear.
- In specific cases, it is best to lightly lubricate the contact points between the pad backing plate and slides with synthetic grease. Do NOT use copper grease and be careful to not allow grease to touch the friction material.
- Insert wear indicators in or on the brake pads. Install the caliper fixing bolts and replace the old thread-lock bolts.
- Follow the manufacturer's recommended tightening torque and sequence. When the brake caliper is reassembled, pump the brake pedal until the stroke is around one third of a full stroke. Check if the brake is operating correctly, including pad retraction. Refit road wheel and check for free rotation. If there is free rotation, the vehicle is ready to go.
The content contained in this article is for entertainment, informational and promotional purposes only and should not be used in lieu of seeking professional advice from a certified technician or mechanic. We encourage you to consult with a certified technician or mechanic if you have specific questions or concerns relating to any of the topics covered herein. Under no circumstances will we be liable for any loss or damage caused by your reliance on any content.